Here's the next part of our series on successfully uploading your app to the App Store and Google Play. This time, we're focusing on in-app purchases on Android, which we have a lot of experience with here at Applifting.
One of the challenges that Android developers face is implementing monetization. Making your app a paid app on Google Play is simple, but it poses a potential barrier for entry since you are basically forcing the user to buy a pig in a poke. If you want to avoid that, in-app purchases are here to help.
In-app purchases are transactions happening inside of your app. Their purpose is to facilitate the freemium business model on mobile platforms. You let the user download your app for free, but it offers only limited functionality or, in some cases, the full functionality for a limited time for free. At the same time, it offers an easy way to pay to unlock all its features. The idea is that you let the user get a taste of your app’s capabilities and then try to make them pay for it.
There are two distinct ways you can implement in-app purchases on Android. One of them is through Google Play, and the other is through an alternative payment service provider (Stripe, Adyen, etc.). Both offer basically the same functionality, but the integration details and service fees vary. It is important to note that it is not up to you as a developer to decide which of them to use. Google Play’s billing system has a defined set of use cases in which their payment solution must be used. In all other cases, Google explicitly states that you must not use their billing system and instead have to go with some other payment service provider. Always check Google Play’s help center to be sure what category your use case falls into.
In-app purchases with Google Play Billing
Now that we are familiar with in-app purchases on Android, let’s dive a little deeper into how Google Play Billing works and how to integrate it in your app.
Google Play Billing allows you to sell one-time products and subscriptions. A product is, for example, a premium currency in a game or removal of ads in your application. They can be either consumable or non-consumable. Consumable products can be purchased multiple times since the user consumes them, and eventually, when they run out of it, they need to have an option to buy more. Virtual in-game currencies are one such example. In contrast, non-consumable products cannot be purchased again. Once the user obtains them, they have them forever. A good example of a non-consumable product is ads removal. The user pays once to make the ads disappear, and then they never have to pay for that again.
Subscriptions, on the other hand, grant the user access to certain perks, content, or features your app offers for a specified period of time. Once that period is over, the user loses access and has to renew the subscription. You can sell classic auto-renewing subscriptions as well as those the user has to renew manually.
As you have seen, Google Play Billing offers lots of great features that unfortunately aren’t free of charge. Google will take 15 percent of every transaction for the first one million dollars of earnings each year. If you earn more, the fee is increased to 30 percent for earnings in excess of one million dollars. As we will discuss later on, these are far higher than fees charged by alternative payment service providers.
But enough talking theory, let’s get into practice and see how to set it up.
Google Play Console setup
Before you can start using Google Play Billing, you need to register your app in the Google Play Console. Don’t worry, you will not have to deploy it to production. All you need to do now is to make Google Play aware of your app.
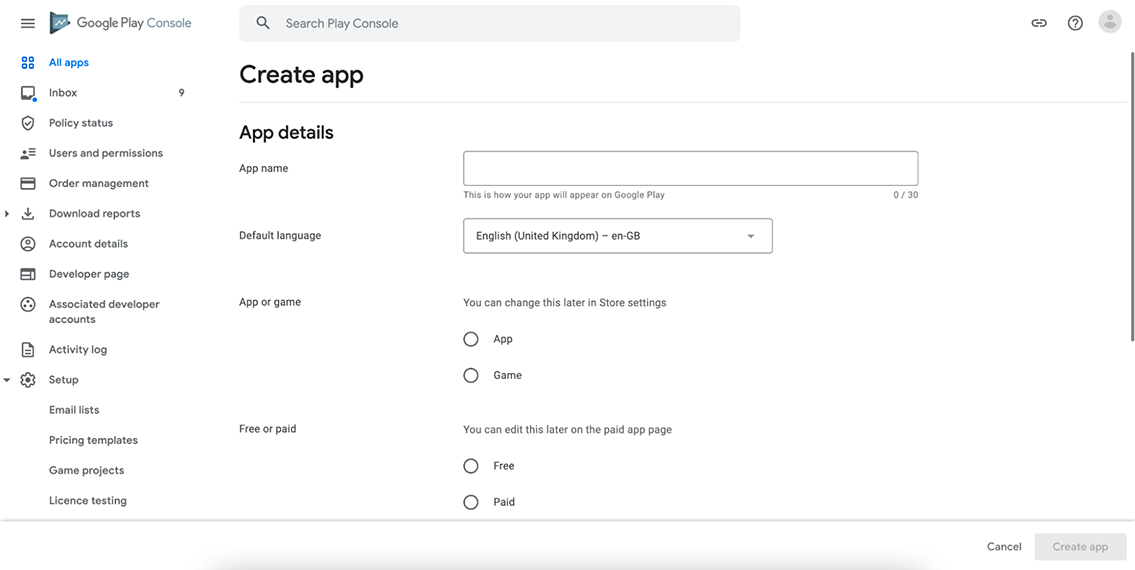
Once that is done, you need to set up a payments profile, whose purpose is to provide Google with more information about your business and to specify how you will be getting paid. In the Play Console, go to All apps → Your app → Monetise → Products → In-app products, and you will see a message prompting you to set up a merchant account.

Click the Set up a merchant account button. On the subsequent screen, you will be asked to create a payments profile. Follow the instructions to set it up.
Next, open your app in Android Studio and add the Google Play Billing Library dependency (version 5.0.0) to your app.

Build a release version of your app and upload it to the Google Play Console. It does not matter which track you upload it to, even the internal testing one will work just fine. The Play Console then detects the presence of the billing library in your app and enables monetization features.
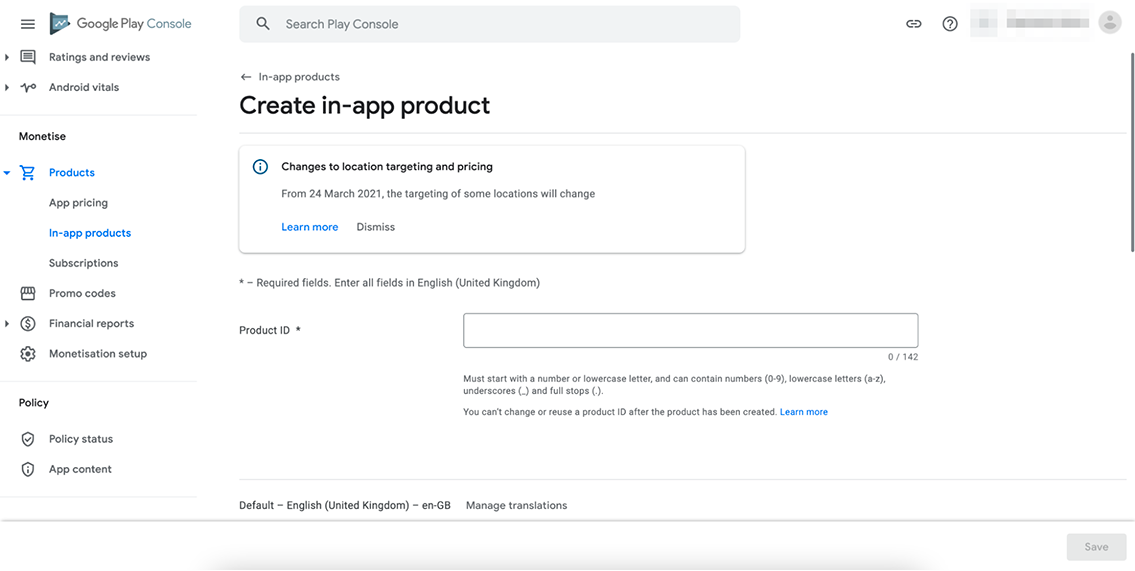
Now that your app has the billing features enabled, it’s time to add some in-app products. In the Google Play Console, navigate to Monetise → Products in the left menu. This is the section where you add and set up all the products and subscriptions you want your app to offer.
When adding a new product or subscription, you always need to give it a unique identifier. This is the only field you will not be able to change later. The other fields—like name, description, or price—can be adjusted later on. Once you create a product, it is in an inactive state, which means that it has been successfully created but cannot be used in the app yet. Activating a product, and therefore making it live, is a matter of clicking a button in the Play Console. You can also deactivate the products later if you want to retire them, for example. That way, the products are still in the Play Console but not being offered to your users at the moment.
Integrating Google Play Billing into your Android app
Once you have an active product, you need to head back to Android Studio and implement billing features. Even though the Billing API is quite developer friendly, it is handy to create a dedicated class for encapsulating all the billing-related code. We won’t be going into the nitty-gritty implementation details since this mostly includes code you can easily find in the Billing API documentation. Instead, we will go through the setup and payment initiation flow so that you know what to do, when to do it, and what not to forget.
To properly set up billing after your app has been launched, you need to create and initialize a so-called billing client. It’s just a class from the billing library that you use to interact with Google Play Billing. When doing so, hook up listeners to the client so that your code gets notified about important events, such as new purchases being made. Once that’s done, tell the client to connect to Google Play. It will then notify the hooked-up listener about the result. If a connection issue occurs, display an appropriate error message. If, however, the connection is successfully established, Google Play Billing is ready to work with your app.
The first thing that you need to do after a successful connection is to use the billing client to fetch up-to-date information on all your in-app products and subscriptions. It is good to note that you cannot tell it to give you all the products. You have to explicitly state which products you want it to fetch using a list of product IDs that you pass to the client. It will then return all the information about the listed products and subscriptions that you filled in the Google Play Console. The most important one is, of course, the price. Here, it is important to mention that an update of your in-app products is not reflected immediately in the data that the billing client returns to your app. For example, if you change the price of a product, it is effective immediately in the purchase flow (meaning that all users will pay the updated price from that moment on), but the client will still be giving you the old price for a couple of hours. Keep this in mind.
Alongside fetching product details, you also have to fetch purchases of the current user so that you can see which products or subscriptions they have bought and should therefore have access to. This is crucial, and you should do it every time your app comes to the resumed state. That way, the app will be aware of all the user’s purchases, even the ones that have been made outside of it (for example, on a different device).
It is not sufficient to just fetch the purchase information though. We also need to validate each individual user purchase. The thing is that purchases have a lifecycle, and we want to grant access to the product or subscription only if the purchase is successfully completed and acknowledged by our app. A purchase can be in four different states:
- purchased and acknowledged
- purchased
- pending
- unspecified
Before we proceed, let’s stop here for a while and talk a bit more about these individual states. The purchased and acknowledged state refers to a purchase that has been successfully made and the app has confirmed that everything is alright on its side and granted access to the user. The purchased (and not yet acknowledged) state indicates that the purchase has been made, but the app has not confirmed it yet, and therefore the user does not have access to the product or subscription right now. The pending state exists to support so-called pending transactions. In certain countries, users can initiate a purchase in the app and decide to pay in cash. The user then has to go to a physical store, where they pay and complete the purchase. But before they do so, the purchase is not yet completed, so it is in the pending state.
One thing that may be obvious but still worth mentioning is that you should only acknowledge purchases in the purchased state because those are the purchases that have been completed and paid. Don’t acknowledge purchases in the pending state since the user may never actually pay. Regarding the acknowledgement of a purchase, Google Play has a policy that states that if you do not acknowledge a purchase within three days, it gets automatically refunded.
Apart from checking the state of the purchase, it is also a good idea to verify its signature. Signature verification can be done locally using the public key of your Google Play Developer Account or on the backend via the Google Play Developer API. It is advisable to verify purchases both ways to minimize the risk of your app becoming a victim of fraud.
Now that we have made sure the user sees up-to-date product information and has access to all their bought products, it’s time to take a look at the purchase initiation flow.
Once the user picks the product they want to buy, your app needs to first find product details of the particular product (the product details that it got from the billing client). Next, you pass it to the client, which takes care of presenting the payment UI and completing the purchase. It will then notify the hooked-up listener about the result of the purchase. If the client reports that the purchase has been successfully completed, you should first verify the signature of the purchase, and, if valid, acknowledge the payment.
Google Play Billing offers a simple-to-use and developer-friendly way of accepting payments inside of your Android apps. This comfort, however, does come at a price that is nowhere near negligible. Despite that, at the end of the day, it is still an attractive payment processing solution. It is just a shame that Google forces developers to use it.
Alternative payment service providers
So far, we have covered the Google Play Billing scenario, but what about those cases when you cannot use it? That’s exactly what we are going to take a look at next.
Theoretically speaking, you can use any payment service provider you like, but it is a good practice to pick one that has a dedicated Android library for better user and developer experience. Stripe and Adyen are good examples of providers that meet this criterion. As Stripe is more commonly used than Adyen, we are going to spend the rest of the article talking about it.
Before we get our hands dirty, let’s stop for a while and focus on Stripe’s capabilities. The first thing to note is that Stripe is a whole family of various financial services including, for instance:
- Stripe Payments for accepting payments
- Stripe Billing for selling and managing subscriptions
- Stripe Radar for fraud detection
- and many more
The number of products Stripe offers is almost overwhelming, but it is without a doubt a powerful base on which to build your software solutions. Stripe’s biggest advantage over Google Play Billing is, however, its fees. Each service comes with its own fee, so it can be tedious to calculate exactly how much you are going to pay if you use multiple services. Either way, Stripe’s fees are far lower than Google’s. For instance, Stripe Payments takes 1.4% + EUR 0.25 (and then 2.9% + EUR 0.25 for non-European cards) of every payment you make with it.
Diving deep into Stripe’s features is beyond the scope of this article. Here, we are going to focus on how to integrate Stripe Payments into an Android app. So without further ado, let’s get right into it.
Stripe Account setup
First, it’s necessary to create a Stripe account, which is a matter of a few minutes. Once you are logged in, you will see the dashboard, where you can manage all the services you are using, list all the payments, and much more.
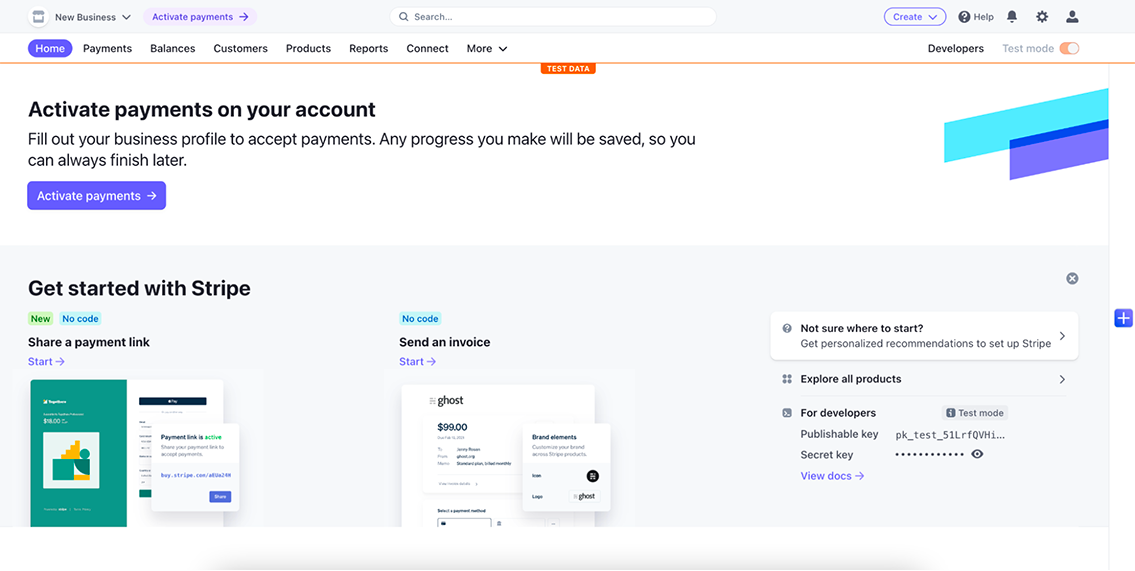
The account is by default in a so-called test mode, which is indicated by the subtle orange line at the top and the orange label saying Test data. When in test mode, you cannot accept any real payments, but you can use all the Stripe APIs and start integrating them into your app straight away. Stripe also provides you with test cards that you can use (in test mode only) to simulate payments and test that everything works as expected. When you want to accept real payments, you will need to provide Stripe with more information about your business. Once you have done that, your account will be activated, and Stripe will let you turn off the test mode.
Backend setup
Next, add Stripe to your backend REST API. It offers libraries for a wide variety of backend frameworks. If your app doesn’t have a backend, you will need to create it. You can’t use Stripe in your Android app without a backend infrastructure. Once imported, you need to pass your Stripe account’s secret key to the library so that it knows what account to connect to. You can obtain the secret key in the dashboard. As soon as you have done that, you are ready to start interacting with Stripe.
Add a new endpoint that accepts information about the payment you want to initiate—it can be, for example, a list of IDs of products that the user wants to buy. Based on that, the endpoint should calculate the final price and create a Stripe payment intent using the Stripe library imported earlier. A payment intent is, as the name suggests, an intention to pay. It contains all the information about the soon-to-happen payment. Get the payment intent’s ID and make the endpoint return it in the response.
Integrating Stripe into your Android app
Head over to Android Studio and add Stripe Android SDK dependency to your project.

After that, you also need to tell the library what your Stripe account is. More specifically, you have to pass it your account’s publishable key, which you can also acquire from the dashboard. That way, Stripe is ready to be used in your app.
When your app wants to accept payments with Stripe, it needs to create an instance of a payment sheet, which is just a class from the Stripe Android library used for presenting checkout UI. It provides a UI component capable of handling the entire payment flow. The payment sheet is usually triggered by a user action, such as clicking the checkout button. The sheet then slides in from the bottom of the screen, overlaying its content.
Now that Stripe is properly set up with your account and you have the payment sheet created and ready to be triggered, it’s time to connect the dots. When the user picks a product they want to purchase, the Android app has to call and pass the information to the backend endpoint we created earlier. The endpoint calculates the final price, creates a Stripe payment intent, and returns its ID. All your app then needs to do is pass the payment intent ID to the payment sheet, which will take care of the rest. It will present the payment UI, collect the user’s payment details, and report the result of the payment back to your code via a callback. Optionally, you can also pass a configuration object to the payment sheet in order to customize its appearance or behavior.
Besides that, the payment sheet handles one more important thing for us. It automatically handles 3D Secure authentication requests. The thing is that when you, as a business, try to charge your customer’s card, the charge does not have to be automatically approved by the customer’s bank. It might ask for additional authentication of the user, which is referred to as 3D Secure. It can involve sending an authentication code to the customer over SMS or requiring the customer to confirm the charge in their mobile banking app. Your payment flow UI must be able to handle these scenarios since they are quite common these days. Thankfully, Stripe’s payment sheet does all this for us.
Our app is now capable of accepting payments via Stripe. But there is still one little thing we should tackle before we call it a day, and that is Google Pay support. Google Pay is a nice and convenient way of making a payment online without having to type our card details over and over again. Stripe supports Google Pay out of the box. All you have to do to add it to the payment sheet is to adjust the configuration object, telling it to enable Google Pay. No need to explicitly add the Google Pay library to your Android project or to interact with Google Pay directly in any way. The Stripe Android library takes care of all that behind the scenes.
All in all, Stripe is a wonderful alternative to Google Play Billing. It is just as easy to use and offers much lower fees. If your use case forbids you from using Google Play Billing, Stripe is certainly a good way to go.
And if you feel like you could use some help, simply get in touch. We'll be happy to assist you not just with the in-app purchases set-up, but also with validating the product-market fit of your app.
Join our newsletter
By clicking the button I agree with the collection and processing of my personal data as described in the Privacy policy.